Contents
- Overview
- Download the Source Code
- Storing Password Data
- Retrieving Password Data
- Load Page
- View Page
- URL Parameters
- Choosing Your Master Password
- Entering Data
- Tested Browsers and Devices
- Known Issues
- Acknowledgements
- License
?
Overview
PassMan is a free, open-source tool written in javascript that allows you to manage password data in your browser locally without interactions to and from a remote server. You can use it along with tools like PassGen and PassGenW to securely create and maintain passwords for your accounts. I wrote it because I wanted something more secure than what is currently available.
The currently released version is 0.7. It differs from 0.6 in three ways. First it provides a “Generate URL” button that allows you to create a URL with GET parameters that can be used to restore your session easily. It does not capture the password for security reasons. Second it provides a “Reset” button which clears all of the fields and the persistent storage and third, it stores your data persistently in the local browser so that you do not have to re-enter the data each time you use it. The localStorage capability provided by modern browsers is much more secure than cookies of previous generations.
This screenshot shows what it looks like for dummy data.
It is very similar to existing solutions in that it uses a master password or phrase to protect your data. It does not support two factor authentication because the implementation makes it unnecessary. The data is always encrypted until you use it locally in your browser.
Most password managers are a combination of a local application coupled with a web based client/server model so they are very convenient because they provide services like auto-filling forms and support across multiple platforms but there are potential security risks because it is hard to know how secure the back end implementation is. There are other password managers that are completely local (like using Microsoft Excel) but they are not interesting to me because I require cross platform support for my PC’s, my tablet’s and phones from different vendors.
There are a number of potential attacks for back-end implementations including insecure software implementations, hackers, unscrupulous employees, natural disasters and equipment failures. The worst case is where your password data is stored in plaintext in a database on an insecure server so an attacker could steal and use it at will. I would consider that risk extremely low for any reputable firm but even if your data is safely encrypted and protected according to modern security practices, you still may be at risk from an attacker who deletes your data or changes your master password. You may also be at risk from a natural disaster if the vendor has not adequately protected their site and, finally you may be at risk from a man-in-the-middle/side attack (MTM) as your data is being transferred to/from the site over an HTTP or even an HTTPS (TLS/SSL) connection.
PassMan mitigates those potential attacks by giving you complete control over your data and by doing all of the encryption/decryption locally in your browser. Furthermore, because it is open source, you can audit the source code to make sure that it conforms to your security requirements.
This approach is relatively secure but it comes at cost. PassMan is not as easy to use as commercial password managers because it does not provide auto-fill capabilities and you must manage the persistent password files manually.
For example, you must use cut-n-paste to transfer account data because an auto-fill paradigm requires cross domain data transfer which is not allowed by modern browsers as a defense against cross-site scripting (XSS) attacks. Commercial password managers get around this by providing browser plug-ins or local programs. That could certainly be done for PassMan as well and I may do it in the future.
In addition, managing your data in files is also cumbersome because browsers do not allow you to write to files locally in javascript. The HTML5 File API offers some hope to get around this limitation but at the time of this writing was not widely available. To get around that you must open a file for editing using the browser or some sort of editor so that you can cut-n-paste your data into the file.
For me the trade offs in useability are worth the inconveniences because of the increased security but I can certainly see where others may prefer the convenience of existing solutions.
Download the Source Code
Although you can use the tool directly from this web site, the source code is freely available under the terms of the MIT license and can be downloaded from http://projects.joelinoff.com/passman/passman-v0.6.tar.bz2. It is about 4MB. The version is 0.7, the check sum is 45452 and the number of blocks is 4138. The check sum was generated using the linux sum command.
Storing Password Data
As mentioned in the overview, modern browsers do not allow you to read and write local files using javascript for security reasons which means that you have to use cut-n-paste to store your data although the data can be stored in localStorage. This is done in v0.7 and beyond but even with that capability it is limited to a single platform. To save the data to an external file the steps are:
- Open your favorite editor. Make sure that it can write ASCII text.
- Make sure that your password is correct.
- Encrypt your data in PassMan by clicking the Encrypt button.
- Select your data in PassMan by clicking the Select button. You will see it highlighted.
- Copy your data into the clipboard using File –> Edit –> Copy or a keystroke combination.
- Paste your data into your editor.
- Save it to a file from your editor.
The data is stored in JSON format as ASCII.
Here is how you select the data.
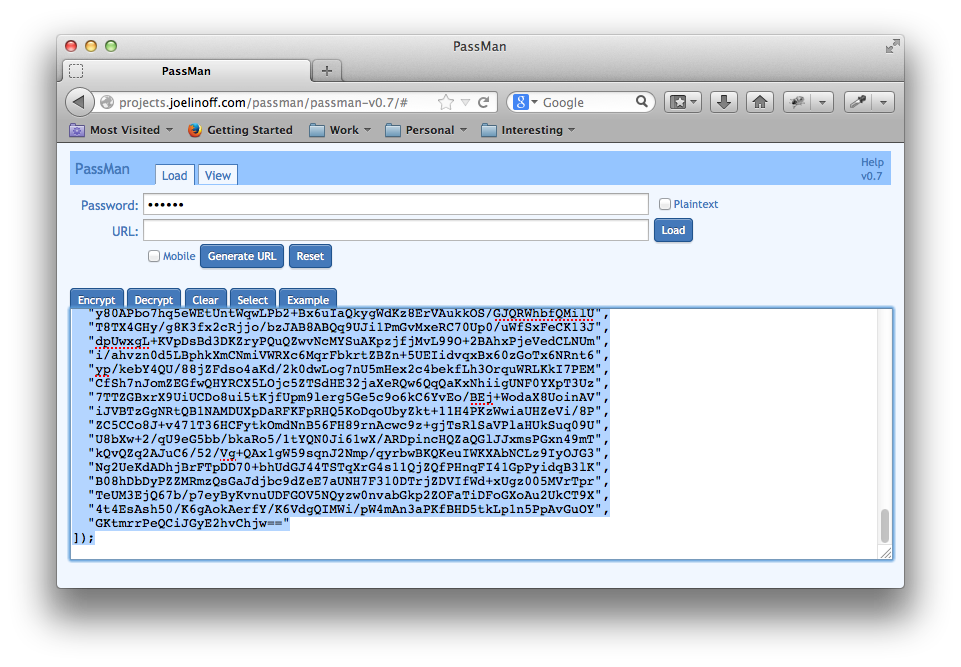
You can then cut it and insert it into your favorite editor and save it.
Now it is available for retrieval.
Retrieving Password Data
There are two ways to access a saved file: you can paste it into the textarea in PassMan or you can load it directly from a web site using a URL where it is stored as a JSONP file. Once you have retrieved it once, it will be remembered in the browser until you reset the data or change it.
The URL approach can only be used if you have stored the password data on a file on a web site where it is accessible over the internet. I have an example json file in http://projects.joelinoff.com/passman/example.json that shows how URL retrieval works. Simply enter it in the URL box, enter the password (123) and click the Load button. In a few moments the data will appear in the text box.
If you are not storing the file on a web site, then you must load it manually using the following steps.
- Open PassMan in your browser.
- Clear the text area by clicking on the Clear button.
- Open your file in the browser in another window or tab or open it in your favorite editor.
- Select the contents.
- Copy them to the clipboard.
- Paste them into the text area in PassMan in the Load tab.
- Enter your password.
- Click on the View tab to see the data.
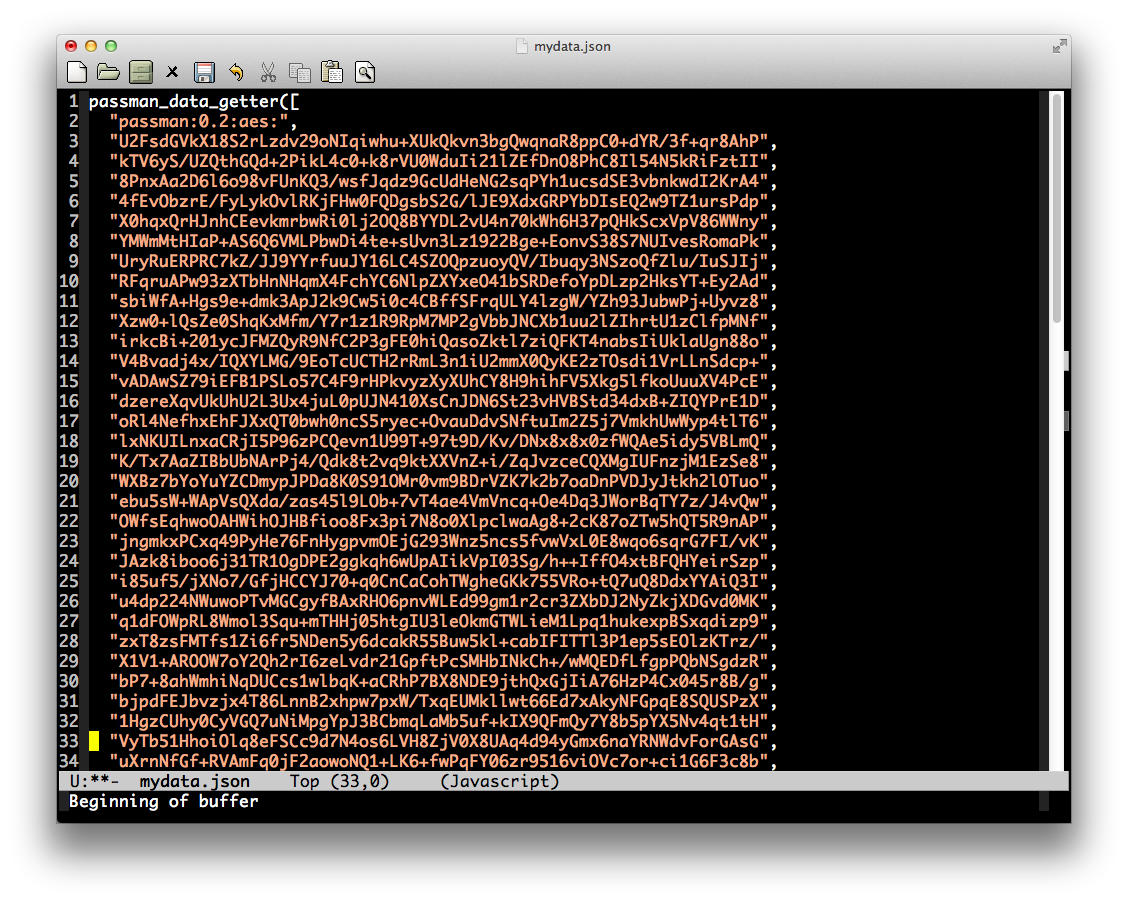
If your data doesn’t display properly it may mean that the password is incorrect or that the data was corrupted. You can check whether the password was correct by clicking the on the Plaintext checkbox so that you can inspect the password. You can check the data by verifying that it starts with “passman_data_getter([” and it ends with “]);“.
Load
The load page is where you define the password data that will be viewed. It can be used to create new password data or load existing password data. All of the controls on this page have been tested with mobile devices so they should work for you.
When you first bring up PassMan it looks likes this. If you are in a device with a large screen the Mobile checkbox will not be checked. If it is a small display it will be checked automatically but you can override it.
At the very top there are two tabs: Load and View. The Load page (this one) is the default starting point. The View page is where you view the data.
Password Field
The first field on the screen is the Password field. This is the master password that it used to encrypt or decrypt your data. It should be at least 20 characters long but it should be easy to remember. See the Choosing You Master Passwords section for more details.
Plaintext Checkbox
The Plaintext checkbox to the right of the Password field will display your password in in plaintext when checked. This is convenient for verifying that what you typed is correct but it is a security risk. Make sure that you never leave the Password field set when your computer is unattended.
URL Field
The URL field is where you specify web accessible password files. An example would be http://projects.joelinoff.com/passman/example.json. See the Storing Password Data section for details about how you would save data for access from a site.
Mobile Checkbox
The Mobile check box enables the mobile view of your data. The mobile view is specified by the columns in the morder record in the input and normally consists of less data to make it easier to read. Note that you can always see all of the data by clicking on the data in the primary key cell. For the example data that would be the Account entry but you can define whatever you want. See the Data Syntax section for more details.
Generate URL Button
The Generate URL button that allows you to create a URL with GET parameters that can be used to restore your session easily. It does not capture the password for security reasons.
Reset Button
The Reset button which clears all of the fields and the persistent storage. Use it for clearing out all data.
Textarea Buttons
Just below the Mobile check box there are five buttons: Encrypt, Decrypt, Clear, Select and Example. They are all associated with the text area below.
Encrypt Button
The Encrypt button encrypts the data in the text area using the password specified above. It can be clicked multiple times but it will only encrypt once. When data is first loaded from a URL it is displayed as decrypted (plaintext) data to show that is was successfully decrypted for use by the View tab.
Decrypt Button
The Decrypt button decrypts the data in the text area using the password specified above. It can be clicked multiple times but it will only decrypt once.
Clear Button
The Clear button clears the text area. That data in the area is gone. You would need to re-paste it or re-load it to get it back. This button is useful for entering data manually.
Select Button
The Select button selects the data for a cut or copy operation. It cannot copy the data to your clipboard because of browser limitations which means that you must select the data and then copy it to the clipboard using the Edit –> Copy menu operation or system specific hot keys (Ctrl-C on Windows/Linux or Cmd-C on Macs).
Example Button
The Example button inputs example data that you can use to play around with the system. The example data consists of 8 records and a bunch of comments that describe how to use the system. The screenshot below shows what the example data looks like.
The text area is where the password data resides. You can add additional columns, orders, morders or rows to existing data by typing them in manually as decrypted (plaintext) data. These records are described in detail in the Data Syntax section. They will show up in the view when you click on the tab but remember that to keep them permanently you have to save them using the techniques described in the Storing Password Data section.
View
The view page is a table that contains your decrypted password data. The columns displayed are defined by the column record, the row data is determined by the row records and order is determined by the order and morder records in the data. The order record is used when the mobile check box is not checked. The morder record is used when it is. See the Data Syntax section for more details.
All of the controls on this page have been tested with mobile devices so they should work for you.
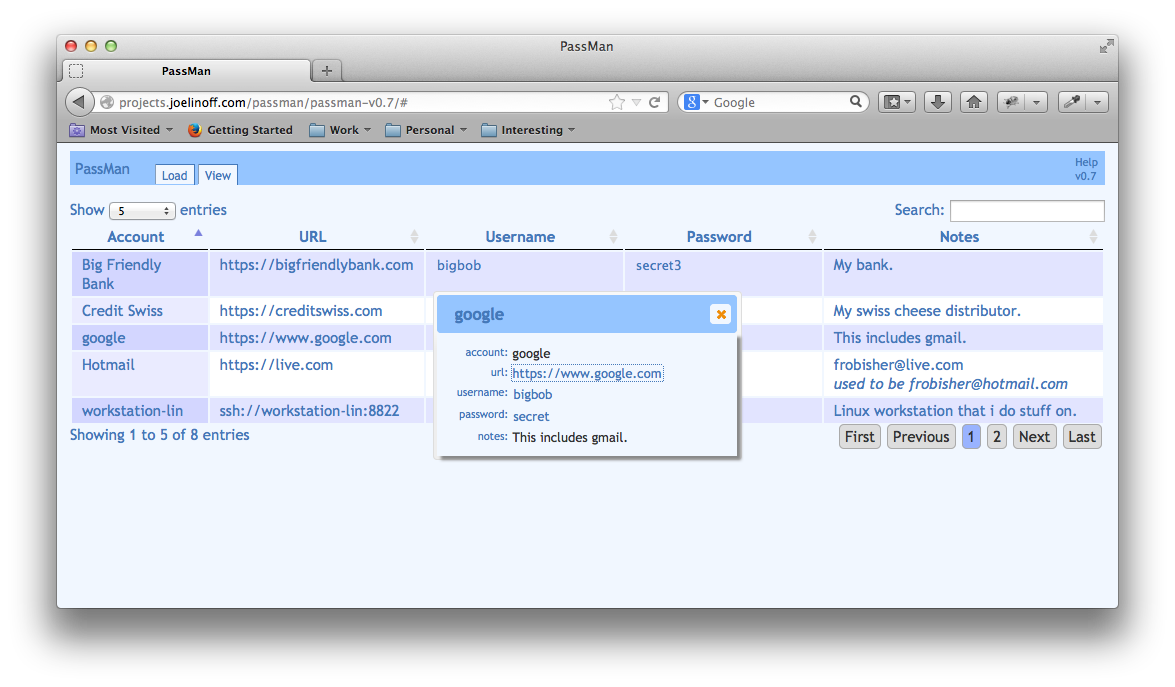
The screen shot below shows what the display looks like for example data on a mobile device.
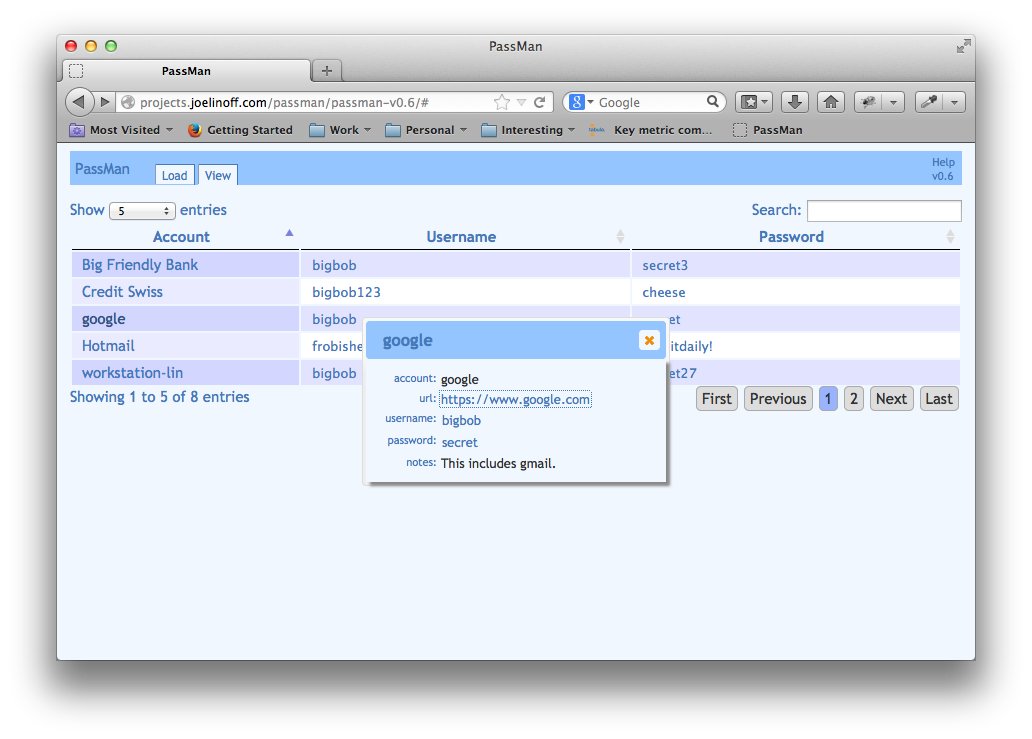
As you can see, three columns are displayed. Note that you can change the columns displayed and the order in order and morder records. To see all of the data for a particular entry click on the entry in the left column. This is the primary key column and clicking on the data will pop up a dialogue that shows all of the data. In this case it is for the google entry.
The columns can be sorted by clicking on the column headers. Multiple columns can be sorted by holding down the shift key and clicking on the column headers.
Records can be searched using the Search box and the total number of entries displayed can be selected by the Show Entries select box.
URL Parameters
There a 6 URL parameters defined by PassMan to make it easy to build URL shortcuts to your data. When you set URL parameters, it automatically clears the persistent storage (localStorage).
Here is an example URL that shows how it works. It loads the example data and sets the mobile settings:
The parameters are described below:
| Parameter | Description |
|---|---|
| example=true | Click the Example button to load the example data. |
| mobile=true | Click the Mobile button to enable the mobile display. |
| password=<string> | Set the password. This is a huge security risk and should only be used for testing. |
| url=<URL> | Load the data from the specified URL. By default the app will wait 500ms for the load to complete. If that is not sufficient define the urlwait parameter to something larger. |
| urlwait=<time in ms> | Wait the prescribed number of mill-seconds for the download to complete. The default is 500 (500ms). |
| view=true | Display the view page. |
Choosing Your Master Passwords
Your master password should be at least 15 characters long and easy to remember because writing it down can be a security risk. I will discuss some strategies for choosing passwords below but before that I want talk about why I feel that we need longer passwords.
I tend to use PassGen or PassGenW to define passwords. PassGenW generates passwords that easier to remember because they are composed of common English words.
Why We Need Long Passwords
We tend to select passwords from a finite set of choices because random patterns are particularly difficult for us to memorize. We also like short character sequences because they are easier to remember.
Both of these work against us because attackers know all about that and use dictionaries of common passwords to quickly determine whether we are using one of the thousands or millions of known passwords. This is possible because short character sequences and common words are each to check. Let’s briefly look at why that is.
If we choose a password that is a common word like “password” or “secret” we are vulnerable to an attack using dictionary words where an attacker simply tries all to decrypt our data using all of the words in the dictionary as the password. For a reasonably powerful modern computer that could run 10,000 tests per minute it would take less than 2 hours to test a million words.
If we choose a random set of 5 characters for our password like “Ae4%.” or “?>3r$” we may think that it is safe but it really isn’t. There are about 90 or so printable characters consisting of lower case letters, upper case letters, digits and punctuation characters. That means that there are 905 or 5,904,900,000 (about 6 billion) possible permutations with replacement.
But how safe is that really? If special purpose cracking hardware can run a million tests per second, then it would take less than 2 hours to try all permutations and crack your password. This is called a brute-force rainbow attack.
Going to 6 characters improves things. The same attack would take about a week so it is clear that adding more characters can make you safer but not necessarily as safe as you think. For one thing, I don’t know how fast cracking hardware is these days but I know that the state of the art is advancing rapidly and the attacks can be run in parallel which may mean that a billion tests per second may not be out of the question in the foreseeable future.
In addition, psychology plays a big role, it is unlikely that we will ever choose something truly random (unless we use a password generator) because we may not like to use shift keys or we find letters are easier to type than the punctuation characters and so on and, finally, remembering long sequences of random characters is really hard so you would probably have to write it down once the number of characters exceeded some number (probably around 7).
Strategies
From the discussion in the previous subsection it is clear that you want to choose a password that is hard to attack using dictionary or brute-force approaches but is easy to remember so you don’t have to write it down. Given the uncertainty of the state of the art for cracking, the password should be at least 15 characters and should not be a common word. It should also have some punctuation, numbers and mixed case letters.
This subsection describes some strategies for choosing passwords.
Strategy #1 – Common Words
The first strategy uses 3 or more common words randomly combined. An example would be “goldfishsummermikonos“. This approach is simple (all lower case letters), fairly easy to remember and reasonably secure. It consists of 21 lower case letters which would have 2126 or about 2.4×1034 permutations for a brute force attack. But a reasonable attacker would not necessarily use a brute force attack, instead they might try word combinations. If they used a dictionary of a million words and tried all combinations of 3 words they would only have to try 1018 permutations which, while very large, is significantly smaller than 1034. That is why you want to have at least 15 characters.
The reason that you want three or more common words is because 1 common word is easy to attack as shown in the previous section and two is within the realm of possibility. Using the previous assumptions based on a dictionary of a million words and a million tests per second, two common words would have 1012 possible combinations which could be cracked in less than 12 days so three is a good choice for a lower bound.
Strategy #2 – Common Words + Prefix
The second strategy is add random prefix to the common words approach. An example would be “F@9/goldfishsummermikonos“. Where the prefix is “F@9/“. This makes the password significantly harder to crack but it is still fairly easy to remember.
Strategy #3 – Common Words + Prefix + Suffix
The third strategy is to add a suffix to the second strategy so that it has three parts: a prefix, the common 3 word phrase and a suffix. The suffix would be a small set of simple random characters.
Strategy #4 – Common Words + Separators
The fourth strategy is to separate the words in the common phrase using a small sequence of punctuation characters, for example “/goldfish/summer/mikonos/” or “/goldfish!summer!mikonos/“.
Strategy #5 – Substitution
The fifth strategy is to substitute symbols for characters so our 3 common words approach might look like this: “901dfi5h5ummermik0n05” where I substituted zero (0) for oh (o), five (5) for “s”, and 9 for “g”. There are many other possibilities for substitution that use punctuation characters like “@” or “&” for a. They are all good approaches if you can remember them.
Conclusion
As you can see, there are many different strategies that we could use. We have only touched upon a few here. Just make sure that your master password is at least 15 characters and try to make sure that it has at least some digits, punctuation characters or capital letters.
Please note that the recommendations in this post do not apply if you write your password down and leave it lying around, or give it away or send it in an email, a skype message, a twitter message, an IRC chat or any other public forum. No form of electronic communications is secure.
If you must send your password to someone, consider using PKI (public key infrastructure) like GPG or PGP.
Entering Data
Entering data is simple, you simply type the table information into the text area in the load tab or you can enter it into a file and cut-n-paste it into the text area.
The data is organized as table data with columns and rows. This format is designed to be simple and flexible so that it can be used for any sort of data not just passwords as demonstrated in example 2.
The format consists of four records: column, order, morder and rows. The column and row records can occur multiple times. Blank lines are ignored and comments start at the beginning of a line with a hash (#) and end at the end of the line.
Each record starts with a record designator which ends with a colon. It is followed by fields. One per line which consist of a key/value pair separated by an equals (=) sign.
In the following subsections each of the records are described in detail along with examples. At the end of this section there two full examples with screenshots.
Records
The records are summarized briefly in the table below and are then discussed in detail in the following sections.
| Record | Designator | Brief Description |
|---|---|---|
| column | col:, column: | Defines a column in the table. It has fixed fields that are described in the col section. The columns must be defined first. |
| order | order: | Defines the order of the columns on a full size display. It is simply a list of the columns that must appear after the columns are defined. |
| morder | morder: | Mobile order. It defines the order and columns to display on a mobile device (small display). It is simply a list of the columns that must appear after the columns are defined. To see all of the column data, click on the primary column and a dialog will pop up with all of the data. For the example data this is the Accounts column. |
| row | row: | Define a row of data using the columns that were previous defined. It must appear after the columns are defined. |
Key/Value Pairs
The fields in the records consist of key/value pairs where the key and value are separated by an equals (=) sign.
The key should be identifier that only consists of lower case letters, underscores, dashes and digits although that is not strictly enforced.
The value can be a single line string or a multi-line string. Single line strings are enclosed in single quotes, double quotes or no quotes. Multi-line strings start are enclosed by ”’ or “”” and are terminated by ”’ or “”” respectively on a line by themselves. Here are examples of the different ways that string values can be specified.
| Type | Example | ||
|---|---|---|---|
| single-line, no quotes | value=true | ||
| single-line, single quotes | value='true' | ||
| single-line, double quotes | value="true" | ||
| multi-line, single quotes |
|
||
| multi-line, double quotes |
|
Column Record
The column records define the data in each column for each row. They must be defined first because they are used by the other record types. There are 7 fields in each column but most of them have defaults so you normally don’t have to specify all of them. The table below describes the fields and their defaults.
| Field | Type | Default | Description |
|---|---|---|---|
| id | string | none | The unique id that defines this column. It is used in the order, morder and row records. |
| halign | enum | left | Horizonal alignment: left, center, right. |
| link | boolean | false | If true, the cell contents are a link. |
| primary | boolean | false | If true, this is the primary key for the rows. It can only be specified for one column. The value for the primary column must be unique for all rows. This is the column that you click on to display all of the column data in the mobile display so it cannot have link or selectable set to true. |
| selectable | boolean | false | If true, the cell contents are selectable which means that you can use a single mouse click to select them. Set this to true for columns like username or password where you want to cut-n-paste the contents. |
| title | string | Capitalized id. | Title used in the table. The default is the capitalized id. |
| valign | enum | top | Vertical alignment: top, middle, bottom. |
Here are some examples of column specifications from the built in example.
|
1 2 3 4 5 6 7 8 9 10 11 12 13 14 15 16 17 18 19 20 |
# Columns col: id=account primary=true col: id=url title=URL link=true col: id=username selectable=true col: id=password selectable=true col: id=notes |
Order Record
The order record defines which columns to display and their display order on a full size display. It should only be specified once and you should specify all of the columns.
The syntax is very simple, each column is denoted by id=<column-id>. An example is shown below.
|
1 2 3 4 5 6 7 |
# Column display/order order: id=account id=url id=username id=password id=notes |
Mobile Order Record
The morder record defines which columns to display and their display order on a mobile display. It should only be specified once an must be specified after the columns are defined.
You do not have to specify all of the columns. In fact, for readability on small screens you probably don’t want to specify more than 4 columns. You can always see all of the column data by clicking on the entry in the primary column. It will popup a dialog box with all of the data.
The syntax is very simple, each column is denoted by id=<column-id>. An example is shown below.
|
1 2 3 4 5 |
# Mobile column display/order morder: id=account id=username id=password |
This is what the popup looks like for the example data when you click on the google entry.
Row Record
The row record defines the data for each row in the table. It is specified by the row: designator followed by an entry for each column that was defined so that the fields are different for different implementations. Here is an example of a couple of row records for the columns defined in the column example.
|
1 2 3 4 5 6 7 8 9 10 11 12 13 14 15 16 17 18 |
# Row data row: account=google url=https://www.google.com username=bigbob password=secret notes=""" This includes gmail. """ row: account=yahoo url=https://www.yahoo.com username=bigbob password=secret1 notes=""" My main page. """ |
Example 1 – Passwords
This example shows a full implementation of a traditional password manager from the example that is built into the tool.
|
1 2 3 4 5 6 7 8 9 10 11 12 13 14 15 16 17 18 19 20 21 22 23 24 25 26 27 28 29 30 31 32 33 34 35 36 37 38 39 40 41 42 43 44 45 46 47 48 49 50 51 52 53 54 55 56 57 58 59 60 61 62 63 64 65 66 67 68 69 70 71 72 73 74 75 76 77 78 79 80 81 82 83 84 85 86 87 88 89 90 91 92 93 94 95 96 97 98 99 100 101 102 103 104 105 106 107 108 109 |
# An example that manages basic password data. # Column definitions col: id=account primary=true col: id=url title=URL link=true col: id=username selectable=true col: id=password selectable=true col: id=notes # Column display/order order: id=account id=url id=username id=password id=notes # Mobile column display/order morder: id=account id=username id=password # Row data row: account=google url=https://www.google.com username=bigbob password=secret notes=""" This includes gmail. """ row: account=yahoo url=https://www.yahoo.com username=bigbob password=secret1 notes=""" My main page. """ row: account=workstation-win url=rdp://workstation-win:3389 username=bigbob password=secret52 notes=""" Windows workstation that i do stuff on. """ row: account=workstation-lin url=ssh://workstation-lin:8822 username=bigbob password=secret27 notes=""" Linux workstation that i do stuff on. """ row: account=workstation-mac url=ssh://workstation-mac:22 username=bigbob password=secret32 notes=""" Mac OS X workstation that i do stuff on. """ row: account="Big Friendly Bank" url=https://bigfriendlybank.com username=bigbob password=secret3 notes=""" My bank. """ row: account="Credit Swiss" url=https://creditswiss.com username=bigbob123 password=cheese notes=""" My swiss cheese distributor. """ row: account="Hotmail" url=https://live.com username=frobisher password=readitdaily! notes=""" frobisher@live.com used to be frobisher@hotmail.com """ |
Here is what it looks like:

Example 1 – Grades
This example shows how you can use passman to display different types of data. In this case a fictional list of students with their grade information for a specific class. The table is very simple, it consists of the student name and the grade (right justified).
|
1 2 3 4 5 6 7 8 9 10 11 12 13 14 15 16 17 18 19 20 21 22 23 24 25 26 27 28 29 30 31 32 33 34 35 36 37 38 39 40 41 42 43 44 45 46 47 48 49 |
# Example student grade list. col: id=name primary=true col: id=grade halign=right order: id=name id=grade morder: id=name id=grade row: name='Mario Speedwagon' grade=3.1 row: name='Petey Cruiser' grade=2.9 row: name='Anna Sthesia' grade=3.3 row: name='Paul Molive' grade=3.6 row: name='Anna Mull' grade=3.7 row: name='Gail Forcewind' grade=2.5 row: name='Paige Turner' grade=3.2 row: name='Bob Frapples' grade=3.2 |
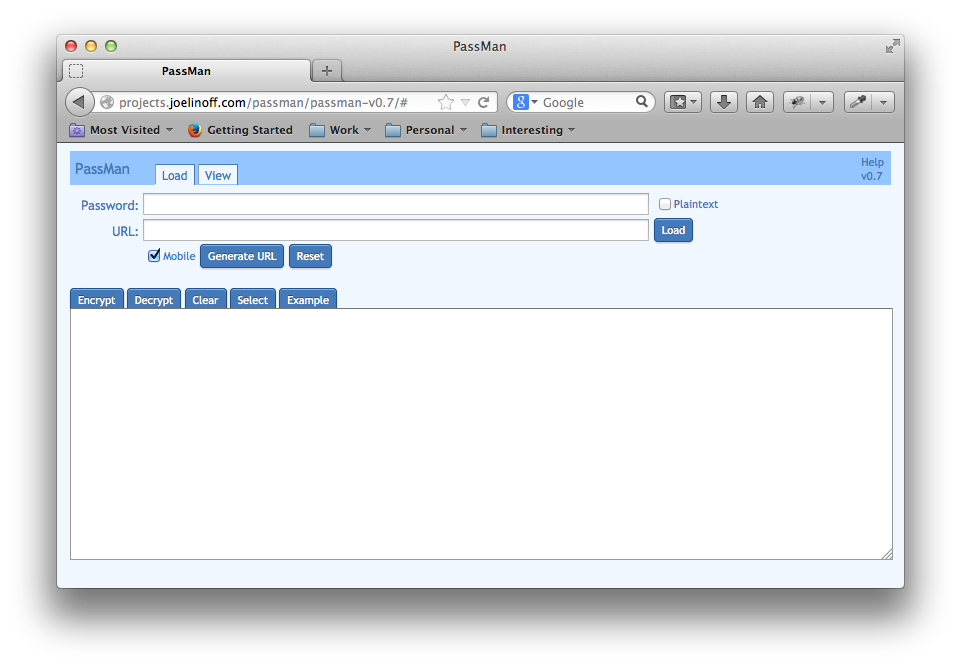
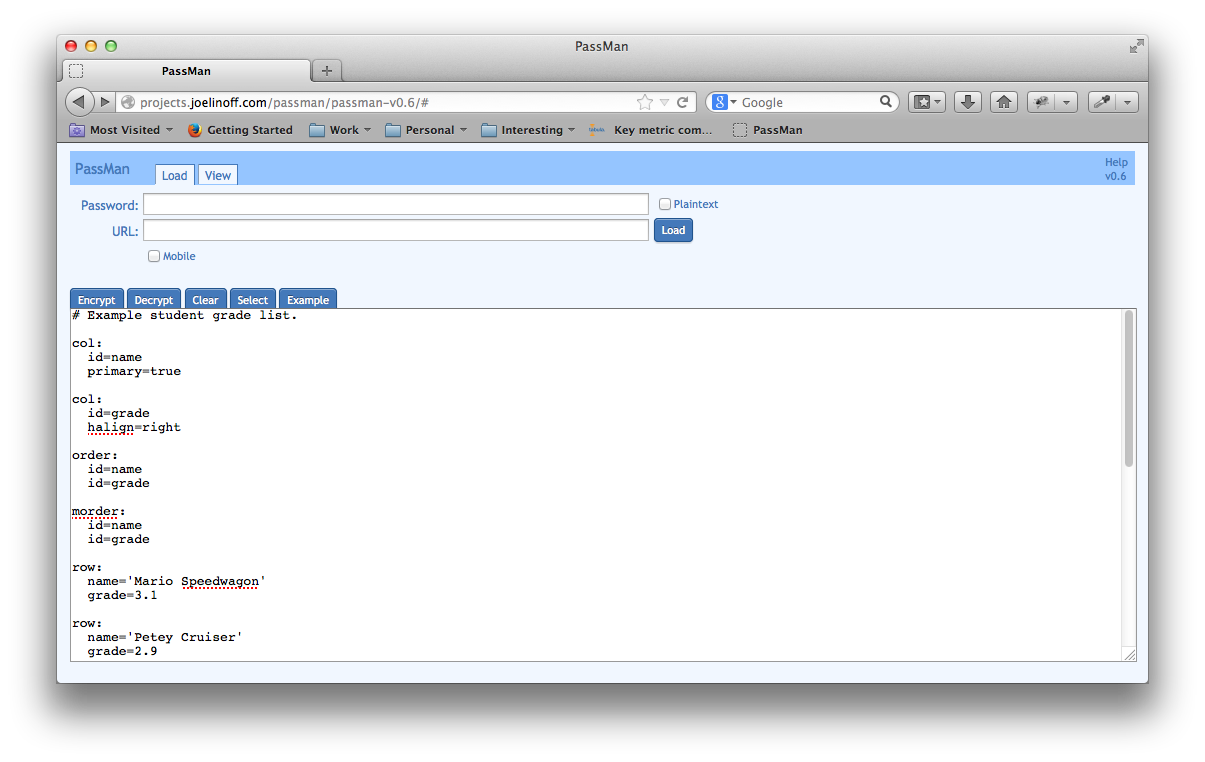
This is what is looks like in PassMan.

This is what the load page looks in PassMan. Note that no password was used.
Tested Browsers and Devices
These are the browsers I have tested PassMan on as of 2013-11-17.
| Browser | Version | O/S | Worked |
|---|---|---|---|
| Chrome | 30.0 | Mac OS X 10.9 | Yes |
| Firefox | 25.0 | Mac OS X 10.9 | Yes |
| Firefox | 25.0 | Windows 7 | Yes |
| Safari | 7.0 | Mac OS X 10.9 | Yes |
| Safari | iOS 7 (iPhone) | Yes | |
| Safari | iOS 7 (iPad) | Yes |
Known Issues
- Tabs don’t align when zooming.
Acknowledgements
This work would not have been possible without the excellent public domain work from these projects:
License
This software is licensed using the MIT license as described here.
Copyright (c) 2013 by Joe Linoff
Permission is hereby granted, free of charge, to any person obtaining a copy of this software and associated documentation files (the “Software”), to deal in the Software without restriction, including without limitation the rights to use, copy, modify, merge, publish, distribute, sublicense, and/or sell copies of the Software, and to permit persons to whom the Software is furnished to do so, subject to the following conditions:
The above copyright notice and this permission notice shall be included in all copies or substantial portions of the Software.
THE SOFTWARE IS PROVIDED “AS IS”, WITHOUT WARRANTY OF ANY KIND, EXPRESS OR IMPLIED, INCLUDING BUT NOT LIMITED TO THE WARRANTIES OF MERCHANTABILITY, FITNESS FOR A PARTICULAR PURPOSE AND NONINFRINGEMENT. IN NO EVENT SHALL THE AUTHORS OR COPYRIGHT HOLDERS BE LIABLE FOR ANY CLAIM, DAMAGES OR OTHER LIABILITY, WHETHER IN AN ACTION OF CONTRACT, TORT OR OTHERWISE, ARISING FROM, OUT OF OR IN CONNECTION WITH THE SOFTWARE OR THE USE OR OTHER DEALINGS IN THE SOFTWARE.