Here is the FreeDOS image file. It can be used to create a bootable USB. At the end of this post I describe, in detail, how I created the image file from the FreeDOS ISO.
1 Download
Here are the download options.
| URL | Format | Size | Checksum | Extraction |
|---|---|---|---|---|
| fdos11.tar.bz2 | tar, gzip | 28MB | 25175 27686 | tar jvxf fdos11.tar.bz2 |
| fdos11.tar.gz | tar, bzip2 | 32MB | 25477 32340 | tar zvxf fdos11.tar.gz |
| fdos11.zip | zip | 32MB | 28567 32337 | unzip fdos11.zip |
Once you have downloaded and unzipped it, you need to flash it to your USB.
1.1 Linux
On linux use the dd tool as follows:
|
1 2 3 4 5 6 7 8 9 10 11 12 13 14 15 16 17 18 19 20 21 22 23 24 25 26 27 28 29 30 31 32 33 34 35 36 37 38 39 40 41 42 43 44 45 46 |
% # Get the bootable USB image and flash the USB. % # Step 1. Figure out the USB device. % # Plug in the USB, it will usually auto-mount. Here are some % # commands you can use to find it. % # Command Notes % # =========================== ============================= % # dmesg The device will be in the log % # ls -l /dev/disk/by-id/usb* List all of theUSB devices % # mount Oftentimes it is in /media % # grep -Ff \ Only Ubuntu/Debian. % # <(hwinfo --disk --short) \ % # <(hwinfo --usb --short) % USB=/dev/sdf % # Step 2. Make sure that the device isn't mounted % sudo umount ${USB}1 % # Step 3. Get the archived image. % wget http://downloads.joelinoff.com/fdos11.tar.bz2 % # Step 4. Extract the image. % tar jxf fdos11.tar.bz2 % # Step 5. Flash the USB % dd if=fdos11.img of=$USB bs=1M |
1.2 Windows
On windows you need to unzip the file and then use a tool like imgburn to flash the USB.
I would appreciate any feedback here from windows users.
2 Motivation
Why would anyone want to do this? Well I certainly can’t speak for other folks but I use these USBs when building cloud filers to flash the firmware of SAS/SATA controllers to HBA (I/T) mode so that I can install the ZFS file system without hardware RAID. The flash firmware is always available in DOS format and this distribution is very small so it easily fits on 1GB USB sticks with all of the drivers that I need. For the record, I think that DSL (Damn Small Linux) would be another good alternative.
3 How to Create the Image
Of course the previous sections only describe how to use the image. In this section I describe how to create the image from the ISO on linux by following these steps.
- Download ISO
- Create Local Disk as File
- Install ISO to Disk
- Test Image
- Flash the USB
Each step will be described in detail in subsequent sections. You will need root privileges to flash the image to a USB (step 5).
There are a lot of screens displayed during the FreeDOS installation process but don’t worry the process is pretty fast and once the image is created you can reuse the image over and over.
This documentation was generated as I went through the process using gimp (the option to select a window came in very handy).
3.1 Download ISO
The FreeDOS ISO is available here.
|
1 |
% wget http://www.freedos.org/freedos/files/download/fd11src.iso |
3.2 Create Local Disk as File
Create a dummy disk file that will act like a disk or USB for the installation in the next step. Note that I made it slightly smaller that 1GB to give a bit of overhead for formatting tools.
|
1 |
% dd if=/dev/zero of=fdos11.img bs=1M count=1023 |
3.3 Install ISO to Disk
I did this using qemu which is an open source machine emulator and virtualizer. I tend to use it for all sorts of things like booting from ISO’s and images while my host OS is running.
In this case, it is going to act like machine emulator that boots off of the ISO to perform the installation to the local disk file. Later I will use it to test the install by booting off of the disk file.
If qemu is not installed, see this page for installation details.
The command I used is shown below. It is probably a bit daunting for newbies so each of the fields is described in the subsequent comments.
|
1 2 3 4 5 6 7 8 9 10 11 12 13 14 15 |
% qemu -cdrom fd11src.iso fdos11.img -boot d % # ^ ^ ^ ^ ^ ^ % # | | | | | +-- the D: drive (cdrom ISO) % # | | | | +-------- define the boot device % # | | | +------------------- the C: drive, empty disk % # | | +------------------------------- the ISO image for the cdrom % # | +-------------------------------------- define a cdrom device (D:) % # +------------------------------------------- QEMU |
3.3.1 Initial Window
Once the command is started the following window will pop up. Select install to hard disk. Note that the hard disk here is the fdos11.img file that you created earlier.
3.3.2 Install to Hard Disk
This is the install hard disk screen. Select f to format the disk.
3.3.3 FDISK FAT32 or FAT16
This is the first format hard disk screen. Select N. When I tried to build with Y it didn’t work.
3.3.4 FDISK Options – Create DOS Partition
This is the main option menu for FDISK. It appears many times during the process. At this point select option 1 “Create DOS Partition or Logical Drive”.
3.3.5 FDISK Create DOS Partition
This screen provides options for creating DOS partitions. For this exercise we will only create a single partition for the entire USB so choose option 1 “Create Primary DOS Partition”.
3.3.6 FDISK Create the Primary DOS Partition
This screen asks whether you want to use all of the available disk space. Answer yes (Y).
3.3.7 FDISK Created the Primary DOS Partition
This screen displays after the partition is created. Press the Esc key to continue.
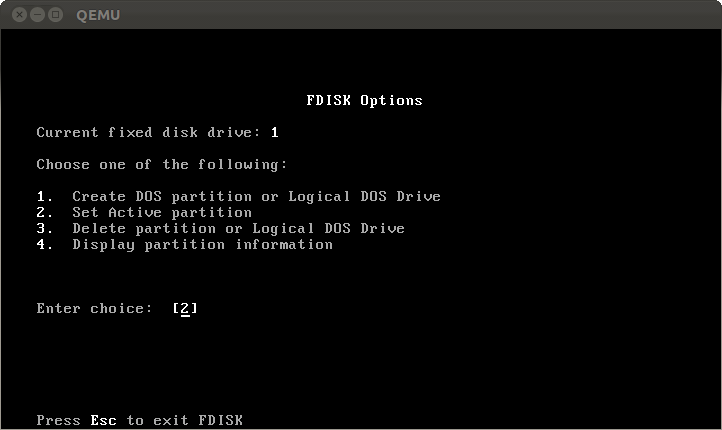
3.3.8 FDISK Options – Active Partition
Select option 2 to make sure that the partition is active. Normally it is set to active by default but it never hurts to check.
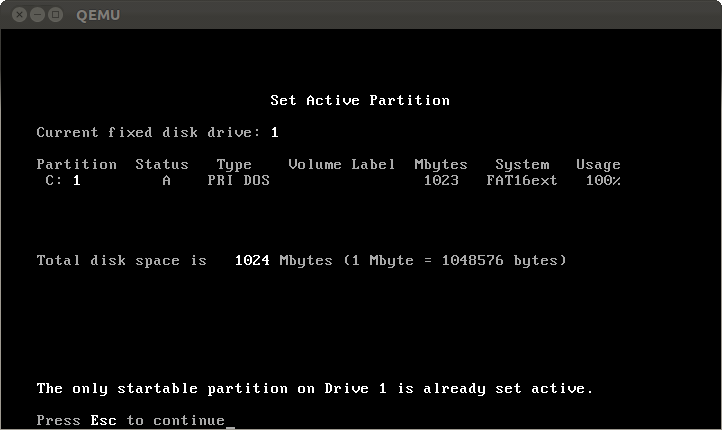
3.3.9 FDISK Set Active Partition
This screen shows that the active partition has been set so you only need to press the Esc key.
3.3.10 FDISK Options – Display partition information
We are back at the main options screen. At this point you will want to do a final verification check by selecting option 4 “Display partition information”.
3.3.11 FDISK Display Partition Information
The partition information is correct. There is only one partition. Press the Esc key to continue.
3.3.12 FDISK Options – Done
We back at the options menu. We are done with formatting so press the Esc key to continue.
3.3.13 FDISK – System Restart
The system is ready to restart. Press the Enter key (or any other key) to proceed.
3.3.14 FreeDOS Installation Screen
Now we are back at the installation screen. Choose option 1 “Install to hardisk” now that the hard disk is formatted. Remember, the hard disk in this case is the fdos11.img file.
3.3.15 Install FreeDOS to the Hard Disk
On this screen type the “1” key. It is no obvious because there is no prompt.
3.3.16 Select the Installation Language
Select your installation language. I chosee option 1 (US English).
3.3.17 Format Disk
This disk was partitioned earlier but it was not formatted. This step does that. Ignore the message about FAT32. It will correctly format the FAT16 partition we created. Select the “Yes” option.
3.3.18 Warning About Losing Data
This screen warns about losing data. That is perfectly fine because it doesn’t have any data yet. Type in YES and press the Enter key.
3.3.19 Continue with the FreeDOS Installation
At this point the disk is partitioned and formatted so we can continue with the installation. Select the first option.
3.3.20 Start the Installation
This screen asks you whether to start the installation. Select the first option.
3.3.21 EULA
This is just a message. Press the Enter key or any other key to continue.
3.3.22 Ready to Install
This is just a message. Press the Enter key or any other key to continue.
3.3.23 Install From/To
This screen presents the from and to directories. You don’t want to change anything. Press the Enter key to accept the default values and continue.
3.3.24 3.3.23 Install From/To Prompt
This screen also presents the from and to directories. You don’t want to change anything. Press the Enter key to accept that the directories are correct and continue.
3.3.25 Choose the Modules to Install
This screen displays the top level modules that you can install. Don’t change anything. Use the defaults. Press the Enter key to continue.
If you want to choose other modules use your right/left arrow keys to navigate and use the space bar to select/deselect.
Later you will be prompted for the individual packages in the modules.
3.3.26 Choose the Packages to Install Prompt
Same screen as 3.3.25. Choose the Yes option from the “Proceed with Installation?” dialogue.
3.3.27 Package List for the Kernel
The packages for the kernel are displayed. You want all of them.
3.3.28
3.3.29 Installation
This is the longest step. Be patient it takes awhile. You do not have to hit any keys.
3.3.30 Done Installing this Series
The initial kernel packages have been installed. Press the Enter key or any other key o continue.
3.3.31 Syslinux Bootloader Collection
This is the bootloader. Press the Enter key to continue.
3.3.32 Syslinux Bootloader Collection Proceed Prompt
This screen displays this dialogue: “Proceed with Installation?”. Select “Yes” to continue.
3.3.33 Installation Progress
This is the installation progress screen. Don’t do anything. It will eventually finish and the next screen will popup.
3.3.34 Installation Finished
This is the screen that pops up after the installation has completed. Press the Enter key or any other key to continue.
3.3.35 Configuring the Disk
This screen shows the progress for configuring the disk. When it finishes, you are prompted to define how the Volume Boot Record is configured. Choose option 1 (Write FreeDOS specific code to this area so KERNEL.SYS will be loaded).
3.3.36 Boot from System Hard Disk
Select the boot from system hard disk option (third option).
3.3.37 Load Without Drivers
Now load without drivers (option 4). You don’t need them.
3.3.38 FreeDOS Booted from the Disk Image
We have the FreeDOS prompt which indicates that it successfully booted off of the disk image!
3.4 Test Image
Although the image worked correctly in the previous section, I also did an alternate test by booting directly from the disk using this command.
|
1 2 3 4 5 6 7 8 9 10 11 |
% qemu dos11.img -boot c % # ^ ^ ^ ^ % # | | | +---- the C: drive (disk image) % # | | +---------- define the boot device % # | +-------------------- the C: drive, new image % # +--------------------------------------------- QEMU |
3.4.1 Initial Screen
Here is the window that you see initially. Choose option 4.
3.4.2 FreeDOS Prompt
Here is the DOS prompt again.
3.5 Flash the USB
Now that we know that the disk image works properly using qemu, we can flash a USB and test it.
3.5.1 Flash Command
Here is the command to flash the USB:
|
1 2 3 4 5 6 7 8 9 10 11 12 13 14 15 16 17 18 19 20 21 22 23 24 25 26 27 28 29 30 31 32 33 |
% # Step 1. Figure out the USB device. % # Plug in the USB, it will usually auto-mount. Here are some % # commands you can use to find it. % # Command Notes % # =========================== ============================= % # dmesg The device will be in the log % # ls -l /dev/disk/by-id/usb* List all of theUSB devices % # mount Oftentimes it is in /media % # grep -Ff \ Only Ubuntu/Debian. % # <(hwinfo --disk --short) \ % # <(hwinfo --usb --short) % USB=/dev/sdf % # Step 2. Make sure that the device isn't mounted % sudo umount ${USB}1 % # Step 3. Flash the USB % sudo dd if=fdos11.img of=$USB bs=1M |
3.5.2 Boot from USB
Now you are ready to go. Remove the USB and plug it back in to mount everything properly. Then run qemu again to boot off of the USB.
|
1 2 3 4 5 6 7 8 9 10 11 12 13 14 15 16 17 18 19 20 21 22 23 |
% # Step 1. Figure out the host parameter by running lsusb % # In this case it is 03f0:b707 % lsusb Bus 001 Device 001: ID 1d6b:0002 Linux Foundation 2.0 root hub Bus 002 Device 001: ID 1d6b:0002 Linux Foundation 2.0 root hub Bus 003 Device 001: ID 1d6b:0001 Linux Foundation 1.1 root hub Bus 004 Device 001: ID 1d6b:0001 Linux Foundation 1.1 root hub Bus 005 Device 001: ID 1d6b:0001 Linux Foundation 1.1 root hub Bus 006 Device 001: ID 1d6b:0001 Linux Foundation 1.1 root hub Bus 007 Device 001: ID 1d6b:0001 Linux Foundation 1.1 root hub Bus 008 Device 001: ID 1d6b:0001 Linux Foundation 1.1 root hub Bus 002 Device 002: ID 0bda:0151 Realtek Semiconductor Corp. Mass Storage Device (Multicard Reader) Bus 006 Device 002: ID 04eb:e033 Northstar Systems, Inc. Bus 008 Device 002: ID 0557:7000 ATEN International Co., Ltd Hub Bus 008 Device 003: ID 413c:2010 Dell Computer Corp. Keyboard Bus 001 Device 006: ID 03f0:b707 Hewlett-Packard % # Run QEMU as root % sudo qemu -usb -usbdevice host:03f0:b707 -m 1024 -vga std |
Here is a screen shot from the live USB showing the boot menu.
Select option 4 and this is what you get.
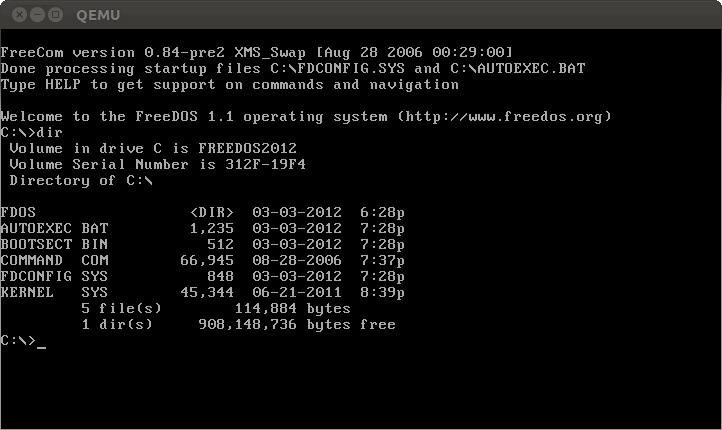
3.5.3 FreeDOS from the USB
I ran the DIR command to demonstrate that it is working.


There’s a typo in your very first Linux script: The “if” parameter of “dd” should point to the untar-ed IMG file, not the BZ2 one.
Thank you. I have fixed it.
Thank you .
You’ve helped out a poor IT guy somewhere. I needed to handle 10s of gigabytes in a dos app. This post helped me do just that!
Thanks.
I use the image to program for DOS as a hobby.