This blog describes a simple open source (MIT licensed) web server that demonstrates how browser/server interactions work for GET and POST requests using the python BaseHTTPServer package. It was updated to version 1.2 on 20-May-2015. This software is licensed under the term of the MIT license. Feel free to use it however you wish.
Use it as a starting point to understand the package when creating your own custom web server for handling specific types of requests but recognize that it is not suitable for a production environment. To use it in such an environment you would, at the very least, want to add improve the error handling and add threading support. You would probably also want to add SSL/TLS support.
Download
To use the simple web server download one of the archives and extract the files.
| Archive | Checksum | Description |
|---|---|---|
| webserver.tar.bz2 | 28050 | Bzip2 format. |
| webserver.tar.gz | 38095 | Gzip format. |
| webserver.zip | 11861 | Zip format. |
The files in the archives are shown below.
| File | Description |
|---|---|
| webserver.css | Sample CSS file referenced by webserver.html. |
| webserver.html | Sample HTML file. |
| webserver.js | Sample Javascript file referenced by webserver.html. |
| webserver.png | Sample PNG file referenced by webserver.html. |
| webserver.py | The web server program for python 2.7. |
| webserver-start.sh | Example script to start the web server. |
| webserver-stop.sh | Example script to stop the web server. |
The example below shows how to download and install using the zip archive.
$ mkdir -p ~/tmp/webserver
$ cd ~/tmp/webserver
$ wget http://projects.joelinoff.com/webserver/webserver-1.2.zip  # download
$ unzip webserver.zip                                             # extract
$ chmod a+x webserver.py                                          # make it executable
$ ls -1
webserver-start.sh
webserver-stop.sh
webserver.css
webserver.html
webserver.js
webserver.png
webserver.py*
Running the Server
After you download the server, you simply run it by typing “./webserver.py” or “python2.7 ./webserver.py“. That will start the server on your local host using port 8080. If that port is already in use, then use the -p option to specify another port like this “./webserver.py -p 9000“. Do not try to use port 80. It will interfere with the normal operation of your system.
$ ./myserver.py
As the simple web server runs, it will print out informational messages as it is running to show you what is happening.
This is the list of options available from the server.
| File | Description |
|---|---|
| -d DIR, –daemonize DIR | Daemonize this process, store the 3 run files (.log, .err, .pid) in DIR (default “.”). Version 1.2 or later. |
| -h, –help | Help message. |
| -H host, –host host | The hostname (e.g. localhost). |
| -l LEVEL, –level LEVEL | Logging level: noset, debug, info, warning, error, critical. Version 1.2 or later. |
| –no-dirlist | Disable directory listings. Version 1.2 or later. |
| -p port, –port port | The port (e.g. 8080). |
| -r dir, –rootdir dir | The web files root directory. |
| -v, –verbosity | Increase verbosity. Not used. |
| -V, –version | Print the version number and exit. |
Accessing the Server
Now that the server is running you can access the webserver.html page by entering the following URL: http://127.0.0.1/webserver.html (you can also use 0.0.0.0 if that is easier to type). If server is running properly you will see something like this:
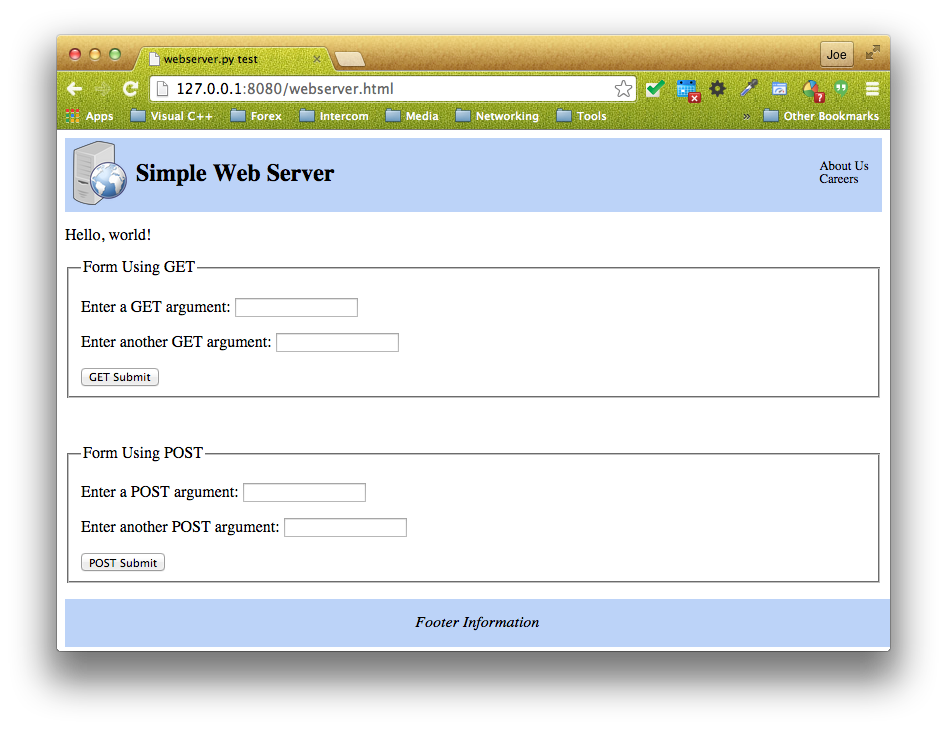
If you enter data in the “Form Using GET” fieldset, the argument values will appear in the webserver output log. If you enter data in the “Form Using POST” fieldset, the argument values will in the webserver output log and on a new page. In both case, you inspect the source code to see how the form data was captured and processed from the browser request.
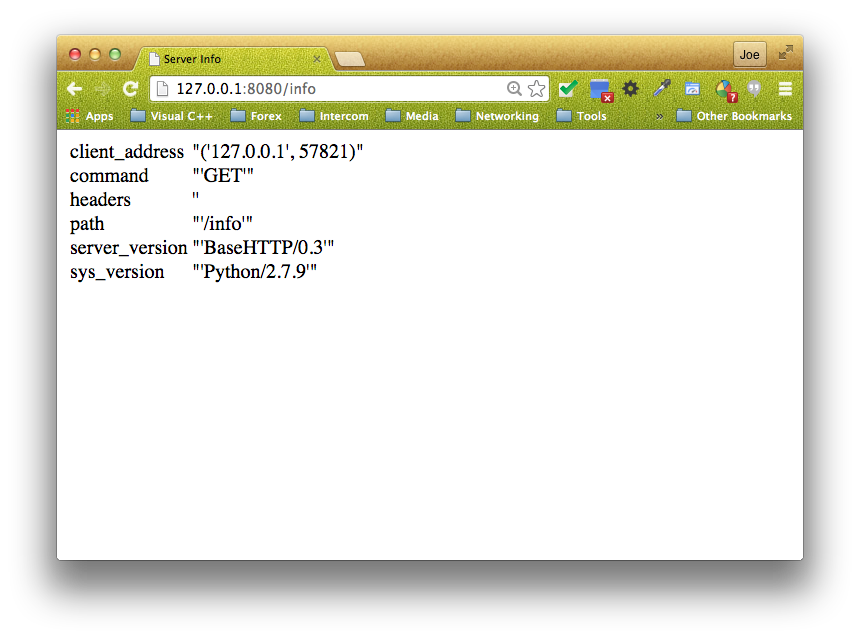
Now try entering “http://127.0.0.1:8080/info” and you will see internal server information. This shows, in a crude way, how you can enter custom URLs.
At this point you have verified that the simple web server is working. If you want to go further, you try creating your own HTML or javascript files.
Implementation Discussion
This implementation uses the BaseHTTPServer and cgi packages for creating the server and processing browser requests. It uses argparse to manage the command lines arguments. There are a number of interesting features of this example.
The first is the use of the class factory make_request_handler_class to allow the request object to have access to the command line options, specifically the root directory for accessing files to display for GET requests. You could add any arbitrary class arguments this way. For example you add the content headers for handling different file extensions which in the current implementation are in the do_GET() handler method.
Another interesting feature is setting the content type based on the file extension.
Yet another interesting feature is that the POST request handler redirects to a custom page with a back button. This is simply to demonstrate that it can be done.
The source code for webserver.py is presented in full below for interactive reference but it probably makes more sense to download it so that you can search through it in your favorite editor.
#!/usr/bin/env python2.7
# -*- coding: utf-8 -*-
'''
Simple web server that demonstrates how browser/server interactions
work for GET and POST requests. Use it as a starting point to create a
custom web server for handling specific requests but don't try to use
it for any production work.
You start by creating a simple index.html file in web directory
somewhere like you home directory: ~/www.
You then add an HTML file: ~/www/index.html. It can be very
simple. Something like this will do nicely:
WebServer Test
Hello, world!
At this point you have a basic web infrastructure with a single file
so you start the server and point to the ~/www root directory:
$ webserver.py -r ~/www
This will start the web server listening on your localhost on port
8080. You can change both the host name and the port using the --host
and --port options. See the on-line help for more information (-h,
--help).
If you do not specify a root directory, it will use the directory that
you started the server from.
Now go to your browser and enter http://0.0.0.0:8080 on the command
line and you will see your page.
Try entering http://0.0.0.0:8080/info to see some server information.
You can also use http://127.0.0.1.
By default the server allows you to see directory listings if there is
no index.html or index.htm file. You can disable this by specifying
the --no-dirlist option.
If you want to see a directory listing of a directory that contains a
index.html or index.htm directory, type three trailing backslashes in
the URL like this: http://foo/bar/spam///. This will not work if the
--no-dirlist option is specified.
The default logging level is "info". You can change it using the
"--level" option.
The example below shows how to use a number of the switches to run a
server for host foobar on port 8080 with no directory listing
capability and very little output serving files from ~/www:
$ hostname
foobar
$ webserver --host foobar --port 8080 --level warning --no-dirlist --rootdir ~/www
To daemonize a process, specify the -d or --daemonize option with a
process directory. That directory will contain the log (stdout), err
(stderr) and pid (process id) files for the daemon process. Here is an
example:
$ hostname
foobar
$ webserver --host foobar --port 8080 --level warning --no-dirlist --rootdir ~/www --daemonize ~/www/logs
$ ls ~/www/logs
webserver-foobar-8080.err webserver-foobar-8080.log webserver-foobar-8080.pid
'''
# LICENSE
# Copyright (c) 2015 Joe Linoff
#
# Permission is hereby granted, free of charge, to any person obtaining a copy
# of this software and associated documentation files (the "Software"), to deal
# in the Software without restriction, including without limitation the rights
# to use, copy, modify, merge, publish, distribute, sublicense, and/or sell
# copies of the Software, and to permit persons to whom the Software is
# furnished to do so, subject to the following conditions:
#
# The above copyright notice and this permission notice shall be included in
# all copies or substantial portions of the Software.
#
# THE SOFTWARE IS PROVIDED "AS IS", WITHOUT WARRANTY OF ANY KIND, EXPRESS OR
# IMPLIED, INCLUDING BUT NOT LIMITED TO THE WARRANTIES OF MERCHANTABILITY,
# FITNESS FOR A PARTICULAR PURPOSE AND NONINFRINGEMENT. IN NO EVENT SHALL THE
# AUTHORS OR COPYRIGHT HOLDERS BE LIABLE FOR ANY CLAIM, DAMAGES OR OTHER
# LIABILITY, WHETHER IN AN ACTION OF CONTRACT, TORT OR OTHERWISE, ARISING FROM,
# OUT OF OR IN CONNECTION WITH THE SOFTWARE OR THE USE OR OTHER DEALINGS IN
# THE SOFTWARE.
# VERSIONS
# 1.0 initial release
# 1.1 replace req with self in request handler, add favicon
# 1.2 added directory listings, added --no-dirlist, fixed plain text displays, logging level control, daemonize
VERSION = '1.2'
import argparse
import BaseHTTPServer
import cgi
import logging
import os
import sys
def make_request_handler_class(opts):
'''
Factory to make the request handler and add arguments to it.
It exists to allow the handler to access the opts.path variable
locally.
'''
class MyRequestHandler(BaseHTTPServer.BaseHTTPRequestHandler):
'''
Factory generated request handler class that contain
additional class variables.
'''
m_opts = opts
def do_HEAD(self):
'''
Handle a HEAD request.
'''
logging.debug('HEADER %s' % (self.path))
self.send_response(200)
self.send_header('Content-type', 'text/html')
self.end_headers()
def info(self):
'''
Display some useful server information.
http://127.0.0.1:8080/info
'''
self.wfile.write('')
self.wfile.write(' ')
self.wfile.write(' Server Info ')
self.wfile.write(' ')
self.wfile.write(' ')
self.wfile.write(' | client_address | ') self.wfile.write('%r | ' % (repr(self.client_address))) self.wfile.write('
| command | ') self.wfile.write('%r | ' % (repr(self.command))) self.wfile.write('
| headers | ') self.wfile.write('%r | ' % (repr(self.headers))) self.wfile.write('
| path | ') self.wfile.write('%r | ' % (repr(self.path))) self.wfile.write('
| server_version | ') self.wfile.write('%r | ' % (repr(self.server_version))) self.wfile.write('
| sys_version | ') self.wfile.write('%r | ' % (repr(self.sys_version))) self.wfile.write('
Server access error.
') self.wfile.write('%r
' % (repr(self.path))) self.wfile.write(' ' % (rpath)) self.wfile.write(' ') self.wfile.write('') else: # List the directory contents. Allow simple navigation. logging.debug('DIR %s' % (dirpath)) self.send_response(200) # OK self.send_header('Content-type', 'text/html') self.end_headers() self.wfile.write('') self.wfile.write(' ') self.wfile.write('' % ('/')); # Make the directory path navigable. dirstr = '' href = None for seg in rpath.split('/'): if href is None: href = seg else: href = href + '/' + seg dirstr += '/' dirstr += '%s' % (href, seg) self.wfile.write('
Directory: %s
' % (dirstr)) # Write out the simple directory list (name and size). self.wfile.write('| ') path = rpath + '/' + fname fpath = os.path.join(dirpath, fname) if os.path.isdir(path): self.wfile.write(' %s/' % (path, fname)) else: self.wfile.write(' %s' % (path, fname)) self.wfile.write(' | ') self.wfile.write(' ') self.wfile.write(' | %d | ' % (os.path.getsize(fpath))) self.wfile.write('
POST variables (%d).
' % (len(postvars))) if len(postvars): # Write out the POST variables in 3 columns. self.wfile.write('| %d | ' % (i)) self.wfile.write('%s | ' % key) self.wfile.write('%s | ' % val) self.wfile.write('
Enjoy!
Updated to version 1.2 today.
Hi Joe,
Thank a lot for your tutorial! May I use it for my project?
When I checked your code with my editor, it informed this function
is deprecated in this module. Use
instead. You may want to update your code later.
Did you think about to use some template for html part? Because write it directly in web server file is not really a good way.
Yes. This is MIT licensed. I need to mention that somewhere. I will update it to make that clear.
And I also want to mention you that this program didn’t work on Windows, as now Windows didn’t support
You may find this link below helpful information:
AttributeError: ‘module’ object has no attribute ‘fork’
Thank you, that is excellent information.
Hi!
I just tried running this and I have a couple of questions.
1) When I first load, I get a warning:
“WARNING: Unobtrusive Javascript not working!” and Javascript is not working. How would you fix that?
2) When I enter something in the POST entries in the form, I get an error.
Error response
Error code 501.
Message: Unsupported method (‘POST’).
Error code explanation: 501 = Server does not support this operation.
Do you have an idea of what might be causing those errors? all I did was copy and run the code.
3) I am trying to quit ./webserver.py, but I can’t find it in my processes. How do you stop the server from running? I wanted to run ./webserver.py again, but I got this error:
ERROR: pid file exists, cannot continue: <filename>.
Thanks!