This blog describes a simple open source (MIT licensed) web server that demonstrates how browser/server interactions work for GET and POST requests using the python BaseHTTPServer package. It was updated to version 1.2 on 20-May-2015. This software is licensed under the term of the MIT license. Feel free to use it however you wish.
Use it as a starting point to understand the package when creating your own custom web server for handling specific types of requests but recognize that it is not suitable for a production environment. To use it in such an environment you would, at the very least, want to add improve the error handling and add threading support. You would probably also want to add SSL/TLS support.
Download
To use the simple web server download one of the archives and extract the files.
| Archive | Checksum | Description |
|---|---|---|
| webserver.tar.bz2 | 28050 | Bzip2 format. |
| webserver.tar.gz | 38095 | Gzip format. |
| webserver.zip | 11861 | Zip format. |
The files in the archives are shown below.
| File | Description |
|---|---|
| webserver.css | Sample CSS file referenced by webserver.html. |
| webserver.html | Sample HTML file. |
| webserver.js | Sample Javascript file referenced by webserver.html. |
| webserver.png | Sample PNG file referenced by webserver.html. |
| webserver.py | The web server program for python 2.7. |
| webserver-start.sh | Example script to start the web server. |
| webserver-stop.sh | Example script to stop the web server. |
The example below shows how to download and install using the zip archive.
|
1 2 3 4 5 6 7 8 9 10 11 12 13 |
$ mkdir -p ~/tmp/webserver $ cd ~/tmp/webserver $ wget http://projects.joelinoff.com/webserver/webserver-1.2.zip # download $ unzip webserver.zip # extract $ chmod a+x webserver.py # make it executable $ ls -1 webserver-start.sh webserver-stop.sh webserver.css webserver.html webserver.js webserver.png webserver.py* |
Running the Server
After you download the server, you simply run it by typing “./webserver.py” or “python2.7 ./webserver.py“. That will start the server on your local host using port 8080. If that port is already in use, then use the -p option to specify another port like this “./webserver.py -p 9000“. Do not try to use port 80. It will interfere with the normal operation of your system.
|
1 |
$ ./myserver.py |
As the simple web server runs, it will print out informational messages as it is running to show you what is happening.
This is the list of options available from the server.
| File | Description |
|---|---|
| -d DIR, –daemonize DIR | Daemonize this process, store the 3 run files (.log, .err, .pid) in DIR (default “.”). Version 1.2 or later. |
| -h, –help | Help message. |
| -H host, –host host | The hostname (e.g. localhost). |
| -l LEVEL, –level LEVEL | Logging level: noset, debug, info, warning, error, critical. Version 1.2 or later. |
| –no-dirlist | Disable directory listings. Version 1.2 or later. |
| -p port, –port port | The port (e.g. 8080). |
| -r dir, –rootdir dir | The web files root directory. |
| -v, –verbosity | Increase verbosity. Not used. |
| -V, –version | Print the version number and exit. |
Accessing the Server
Now that the server is running you can access the webserver.html page by entering the following URL: http://127.0.0.1/webserver.html (you can also use 0.0.0.0 if that is easier to type). If server is running properly you will see something like this:
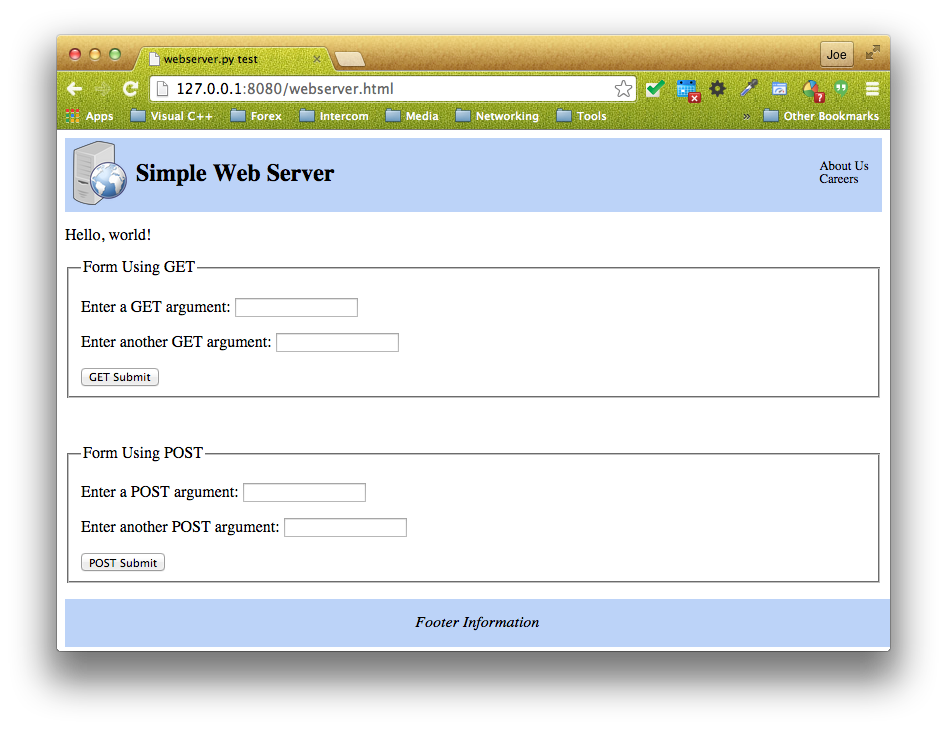
If you enter data in the “Form Using GET” fieldset, the argument values will appear in the webserver output log. If you enter data in the “Form Using POST” fieldset, the argument values will in the webserver output log and on a new page. In both case, you inspect the source code to see how the form data was captured and processed from the browser request.
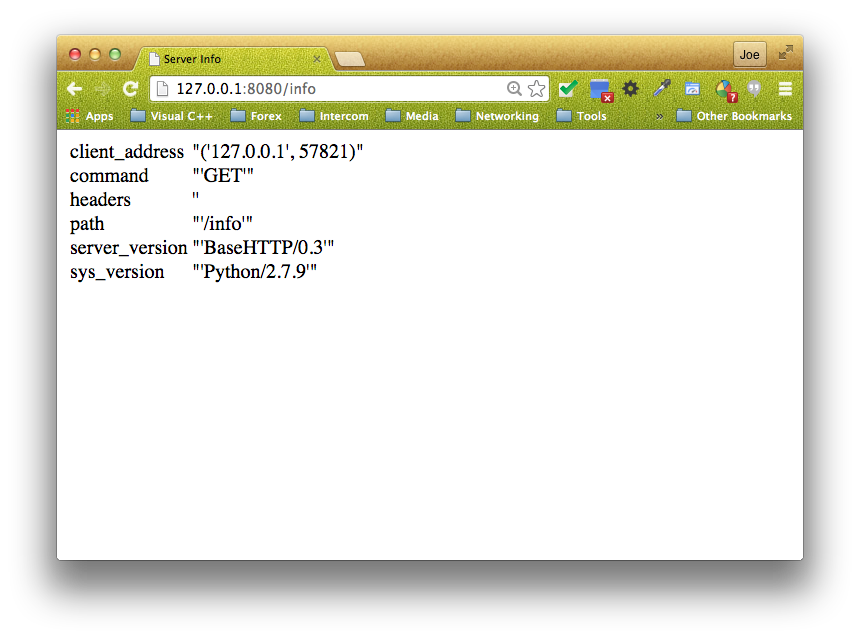
Now try entering “http://127.0.0.1:8080/info” and you will see internal server information. This shows, in a crude way, how you can enter custom URLs.
At this point you have verified that the simple web server is working. If you want to go further, you try creating your own HTML or javascript files.
Implementation Discussion
This implementation uses the BaseHTTPServer and cgi packages for creating the server and processing browser requests. It uses argparse to manage the command lines arguments. There are a number of interesting features of this example.
The first is the use of the class factory make_request_handler_class to allow the request object to have access to the command line options, specifically the root directory for accessing files to display for GET requests. You could add any arbitrary class arguments this way. For example you add the content headers for handling different file extensions which in the current implementation are in the do_GET() handler method.
Another interesting feature is setting the content type based on the file extension.
Yet another interesting feature is that the POST request handler redirects to a custom page with a back button. This is simply to demonstrate that it can be done.
The source code for webserver.py is presented in full below for interactive reference but it probably makes more sense to download it so that you can search through it in your favorite editor.
|
1 2 3 4 5 6 7 8 9 10 11 12 13 14 15 16 17 18 19 20 21 22 23 24 25 26 27 28 29 30 31 32 33 34 35 36 37 38 39 40 41 42 43 44 45 46 47 48 49 50 51 52 53 54 55 56 57 58 59 60 61 62 63 64 65 66 67 68 69 70 71 72 73 74 75 76 77 78 79 80 81 82 83 84 85 86 87 88 89 90 91 92 93 94 95 96 97 98 99 100 101 102 103 104 105 106 107 108 109 110 111 112 113 114 115 116 117 118 119 120 121 122 123 124 125 126 127 128 129 130 131 132 133 134 135 136 137 138 139 140 141 142 143 144 145 146 147 148 149 150 151 152 153 154 155 156 157 158 159 160 161 162 163 164 165 166 167 168 169 170 171 172 173 174 175 176 177 178 179 180 181 182 183 184 185 186 187 188 189 190 191 192 193 194 195 196 197 198 199 200 201 202 203 204 205 206 207 208 209 210 211 212 213 214 215 216 217 218 219 220 221 222 223 224 225 226 227 228 229 230 231 232 233 234 235 236 237 238 239 240 241 242 243 244 245 246 247 248 249 250 251 252 253 254 255 256 257 258 259 260 261 262 263 264 265 266 267 268 269 270 271 272 273 274 275 276 277 278 279 280 281 282 283 284 285 286 287 288 289 290 291 292 293 294 295 296 297 298 299 300 301 302 303 304 305 306 307 308 309 310 311 312 313 314 315 316 317 318 319 320 321 322 323 324 325 326 327 328 329 330 331 332 333 334 335 336 337 338 339 340 341 342 343 344 345 346 347 348 349 350 351 352 353 354 355 356 357 358 359 360 361 362 363 364 365 366 367 368 369 370 371 372 373 374 375 376 377 378 379 380 381 382 383 384 385 386 387 388 389 390 391 392 393 394 395 396 397 398 399 400 401 402 403 404 405 406 407 408 409 410 411 412 413 414 415 416 417 418 419 420 421 422 423 424 425 426 427 428 429 430 431 432 433 434 435 436 437 438 439 440 441 442 443 444 445 446 447 448 449 450 451 452 453 454 455 456 457 458 459 460 461 462 463 464 465 466 467 468 469 470 471 472 473 474 475 476 477 478 479 480 481 482 483 484 485 486 487 488 489 490 491 492 493 494 495 496 497 498 499 500 501 502 503 504 505 506 507 508 509 510 511 512 513 514 515 516 517 518 519 520 521 522 523 524 525 526 527 528 529 530 531 532 533 534 535 536 537 538 539 540 541 542 543 544 545 546 547 548 549 550 551 552 553 554 555 556 557 558 559 560 561 562 563 564 565 566 567 568 569 570 571 572 573 574 575 576 577 |
#!/usr/bin/env python2.7 # -*- coding: utf-8 -*- ''' Simple web server that demonstrates how browser/server interactions work for GET and POST requests. Use it as a starting point to create a custom web server for handling specific requests but don't try to use it for any production work. You start by creating a simple index.html file in web directory somewhere like you home directory: ~/www. You then add an HTML file: ~/www/index.html. It can be very simple. Something like this will do nicely: <!DOCTYPE html> <html> <head> <meta charset="utf-8"> <title>WebServer Test</title> </head> <body> <p>Hello, world!</p> </body> </html> At this point you have a basic web infrastructure with a single file so you start the server and point to the ~/www root directory: $ webserver.py -r ~/www This will start the web server listening on your localhost on port 8080. You can change both the host name and the port using the --host and --port options. See the on-line help for more information (-h, --help). If you do not specify a root directory, it will use the directory that you started the server from. Now go to your browser and enter http://0.0.0.0:8080 on the command line and you will see your page. Try entering http://0.0.0.0:8080/info to see some server information. You can also use http://127.0.0.1. By default the server allows you to see directory listings if there is no index.html or index.htm file. You can disable this by specifying the --no-dirlist option. If you want to see a directory listing of a directory that contains a index.html or index.htm directory, type three trailing backslashes in the URL like this: http://foo/bar/spam///. This will not work if the --no-dirlist option is specified. The default logging level is "info". You can change it using the "--level" option. The example below shows how to use a number of the switches to run a server for host foobar on port 8080 with no directory listing capability and very little output serving files from ~/www: $ hostname foobar $ webserver --host foobar --port 8080 --level warning --no-dirlist --rootdir ~/www To daemonize a process, specify the -d or --daemonize option with a process directory. That directory will contain the log (stdout), err (stderr) and pid (process id) files for the daemon process. Here is an example: $ hostname foobar $ webserver --host foobar --port 8080 --level warning --no-dirlist --rootdir ~/www --daemonize ~/www/logs $ ls ~/www/logs webserver-foobar-8080.err webserver-foobar-8080.log webserver-foobar-8080.pid ''' # LICENSE # Copyright (c) 2015 Joe Linoff # # Permission is hereby granted, free of charge, to any person obtaining a copy # of this software and associated documentation files (the "Software"), to deal # in the Software without restriction, including without limitation the rights # to use, copy, modify, merge, publish, distribute, sublicense, and/or sell # copies of the Software, and to permit persons to whom the Software is # furnished to do so, subject to the following conditions: # # The above copyright notice and this permission notice shall be included in # all copies or substantial portions of the Software. # # THE SOFTWARE IS PROVIDED "AS IS", WITHOUT WARRANTY OF ANY KIND, EXPRESS OR # IMPLIED, INCLUDING BUT NOT LIMITED TO THE WARRANTIES OF MERCHANTABILITY, # FITNESS FOR A PARTICULAR PURPOSE AND NONINFRINGEMENT. IN NO EVENT SHALL THE # AUTHORS OR COPYRIGHT HOLDERS BE LIABLE FOR ANY CLAIM, DAMAGES OR OTHER # LIABILITY, WHETHER IN AN ACTION OF CONTRACT, TORT OR OTHERWISE, ARISING FROM, # OUT OF OR IN CONNECTION WITH THE SOFTWARE OR THE USE OR OTHER DEALINGS IN # THE SOFTWARE. # VERSIONS # 1.0 initial release # 1.1 replace req with self in request handler, add favicon # 1.2 added directory listings, added --no-dirlist, fixed plain text displays, logging level control, daemonize VERSION = '1.2' import argparse import BaseHTTPServer import cgi import logging import os import sys def make_request_handler_class(opts): ''' Factory to make the request handler and add arguments to it. It exists to allow the handler to access the opts.path variable locally. ''' class MyRequestHandler(BaseHTTPServer.BaseHTTPRequestHandler): ''' Factory generated request handler class that contain additional class variables. ''' m_opts = opts def do_HEAD(self): ''' Handle a HEAD request. ''' logging.debug('HEADER %s' % (self.path)) self.send_response(200) self.send_header('Content-type', 'text/html') self.end_headers() def info(self): ''' Display some useful server information. http://127.0.0.1:8080/info ''' self.wfile.write('<html>') self.wfile.write(' <head>') self.wfile.write(' <title>Server Info</title>') self.wfile.write(' </head>') self.wfile.write(' <body>') self.wfile.write(' <table>') self.wfile.write(' <tbody>') self.wfile.write(' <tr>') self.wfile.write(' <td>client_address</td>') self.wfile.write(' <td>%r</td>' % (repr(self.client_address))) self.wfile.write(' </tr>') self.wfile.write(' <tr>') self.wfile.write(' <td>command</td>') self.wfile.write(' <td>%r</td>' % (repr(self.command))) self.wfile.write(' </tr>') self.wfile.write(' <tr>') self.wfile.write(' <td>headers</td>') self.wfile.write(' <td>%r</td>' % (repr(self.headers))) self.wfile.write(' </tr>') self.wfile.write(' <tr>') self.wfile.write(' <td>path</td>') self.wfile.write(' <td>%r</td>' % (repr(self.path))) self.wfile.write(' </tr>') self.wfile.write(' <tr>') self.wfile.write(' <td>server_version</td>') self.wfile.write(' <td>%r</td>' % (repr(self.server_version))) self.wfile.write(' </tr>') self.wfile.write(' <tr>') self.wfile.write(' <td>sys_version</td>') self.wfile.write(' <td>%r</td>' % (repr(self.sys_version))) self.wfile.write(' </tr>') self.wfile.write(' </tbody>') self.wfile.write(' </table>') self.wfile.write(' </body>') self.wfile.write('</html>') def do_GET(self): ''' Handle a GET request. ''' logging.debug('GET %s' % (self.path)) # Parse out the arguments. # The arguments follow a '?' in the URL. Here is an example: # http://example.com?arg1=val1 args = {} idx = self.path.find('?') if idx >= 0: rpath = self.path[:idx] args = cgi.parse_qs(self.path[idx+1:]) else: rpath = self.path # Print out logging information about the path and args. if 'content-type' in self.headers: ctype, _ = cgi.parse_header(self.headers['content-type']) logging.debug('TYPE %s' % (ctype)) logging.debug('PATH %s' % (rpath)) logging.debug('ARGS %d' % (len(args))) if len(args): i = 0 for key in sorted(args): logging.debug('ARG[%d] %s=%s' % (i, key, args[key])) i += 1 # Check to see whether the file is stored locally, # if it is, display it. # There is special handling for http://127.0.0.1/info. That URL # displays some internal information. if self.path == '/info' or self.path == '/info/': self.send_response(200) # OK self.send_header('Content-type', 'text/html') self.end_headers() self.info() else: # Get the file path. path = MyRequestHandler.m_opts.rootdir + rpath dirpath = None logging.debug('FILE %s' % (path)) # If it is a directory look for index.html # or process it directly if there are 3 # trailing slashed. if rpath[-3:] == '///': dirpath = path elif os.path.exists(path) and os.path.isdir(path): dirpath = path # the directory portion index_files = ['/index.html', '/index.htm', ] for index_file in index_files: tmppath = path + index_file if os.path.exists(tmppath): path = tmppath break # Allow the user to type "///" at the end to see the # directory listing. if os.path.exists(path) and os.path.isfile(path): # This is valid file, send it as the response # after determining whether it is a type that # the server recognizes. _, ext = os.path.splitext(path) ext = ext.lower() content_type = { '.css': 'text/css', '.gif': 'image/gif', '.htm': 'text/html', '.html': 'text/html', '.jpeg': 'image/jpeg', '.jpg': 'image/jpg', '.js': 'text/javascript', '.png': 'image/png', '.text': 'text/plain', '.txt': 'text/plain', } # If it is a known extension, set the correct # content type in the response. if ext in content_type: self.send_response(200) # OK self.send_header('Content-type', content_type[ext]) self.end_headers() with open(path) as ifp: self.wfile.write(ifp.read()) else: # Unknown file type or a directory. # Treat it as plain text. self.send_response(200) # OK self.send_header('Content-type', 'text/plain') self.end_headers() with open(path) as ifp: self.wfile.write(ifp.read()) else: if dirpath is None or self.m_opts.no_dirlist == True: # Invalid file path, respond with a server access error self.send_response(500) # generic server error for now self.send_header('Content-type', 'text/html') self.end_headers() self.wfile.write('<html>') self.wfile.write(' <head>') self.wfile.write(' <title>Server Access Error</title>') self.wfile.write(' </head>') self.wfile.write(' <body>') self.wfile.write(' <p>Server access error.</p>') self.wfile.write(' <p>%r</p>' % (repr(self.path))) self.wfile.write(' <p><a href="%s">Back</a></p>' % (rpath)) self.wfile.write(' </body>') self.wfile.write('</html>') else: # List the directory contents. Allow simple navigation. logging.debug('DIR %s' % (dirpath)) self.send_response(200) # OK self.send_header('Content-type', 'text/html') self.end_headers() self.wfile.write('<html>') self.wfile.write(' <head>') self.wfile.write(' <title>%s</title>' % (dirpath)) self.wfile.write(' </head>') self.wfile.write(' <body>') self.wfile.write(' <a href="%s">Home</a><br>' % ('/')); # Make the directory path navigable. dirstr = '' href = None for seg in rpath.split('/'): if href is None: href = seg else: href = href + '/' + seg dirstr += '/' dirstr += '<a href="%s">%s</a>' % (href, seg) self.wfile.write(' <p>Directory: %s</p>' % (dirstr)) # Write out the simple directory list (name and size). self.wfile.write(' <table border="0">') self.wfile.write(' <tbody>') fnames = ['..'] fnames.extend(sorted(os.listdir(dirpath), key=str.lower)) for fname in fnames: self.wfile.write(' <tr>') self.wfile.write(' <td align="left">') path = rpath + '/' + fname fpath = os.path.join(dirpath, fname) if os.path.isdir(path): self.wfile.write(' <a href="%s">%s/</a>' % (path, fname)) else: self.wfile.write(' <a href="%s">%s</a>' % (path, fname)) self.wfile.write(' <td> </td>') self.wfile.write(' </td>') self.wfile.write(' <td align="right">%d</td>' % (os.path.getsize(fpath))) self.wfile.write(' </tr>') self.wfile.write(' </tbody>') self.wfile.write(' </table>') self.wfile.write(' </body>') self.wfile.write('</html>') def do_POST(self): ''' Handle POST requests. ''' logging.debug('POST %s' % (self.path)) # CITATION: http://stackoverflow.com/questions/4233218/python-basehttprequesthandler-post-variables ctype, pdict = cgi.parse_header(self.headers['content-type']) if ctype == 'multipart/form-data': postvars = cgi.parse_multipart(self.rfile, pdict) elif ctype == 'application/x-www-form-urlencoded': length = int(self.headers['content-length']) postvars = cgi.parse_qs(self.rfile.read(length), keep_blank_values=1) else: postvars = {} # Get the "Back" link. back = self.path if self.path.find('?') < 0 else self.path[:self.path.find('?')] # Print out logging information about the path and args. logging.debug('TYPE %s' % (ctype)) logging.debug('PATH %s' % (self.path)) logging.debug('ARGS %d' % (len(postvars))) if len(postvars): i = 0 for key in sorted(postvars): logging.debug('ARG[%d] %s=%s' % (i, key, postvars[key])) i += 1 # Tell the browser everything is okay and that there is # HTML to display. self.send_response(200) # OK self.send_header('Content-type', 'text/html') self.end_headers() # Display the POST variables. self.wfile.write('<html>') self.wfile.write(' <head>') self.wfile.write(' <title>Server POST Response</title>') self.wfile.write(' </head>') self.wfile.write(' <body>') self.wfile.write(' <p>POST variables (%d).</p>' % (len(postvars))) if len(postvars): # Write out the POST variables in 3 columns. self.wfile.write(' <table>') self.wfile.write(' <tbody>') i = 0 for key in sorted(postvars): i += 1 val = postvars[key] self.wfile.write(' <tr>') self.wfile.write(' <td align="right">%d</td>' % (i)) self.wfile.write(' <td align="right">%s</td>' % key) self.wfile.write(' <td align="left">%s</td>' % val) self.wfile.write(' </tr>') self.wfile.write(' </tbody>') self.wfile.write(' </table>') self.wfile.write(' <p><a href="%s">Back</a></p>' % (back)) self.wfile.write(' </body>') self.wfile.write('</html>') return MyRequestHandler def err(msg): ''' Report an error message and exit. ''' print('ERROR: %s' % (msg)) sys.exit(1) def getopts(): ''' Get the command line options. ''' # Get the help from the module documentation. this = os.path.basename(sys.argv[0]) description = ('description:%s' % '\n '.join(__doc__.split('\n'))) epilog = ' ' rawd = argparse.RawDescriptionHelpFormatter parser = argparse.ArgumentParser(formatter_class=rawd, description=description, epilog=epilog) parser.add_argument('-d', '--daemonize', action='store', type=str, default='.', metavar='DIR', help='daemonize this process, store the 3 run files (.log, .err, .pid) in DIR (default "%(default)s")') parser.add_argument('-H', '--host', action='store', type=str, default='localhost', help='hostname, default=%(default)s') parser.add_argument('-l', '--level', action='store', type=str, default='info', choices=['notset', 'debug', 'info', 'warning', 'error', 'critical',], help='define the logging level, the default is %(default)s') parser.add_argument('--no-dirlist', action='store_true', help='disable directory listings') parser.add_argument('-p', '--port', action='store', type=int, default=8080, help='port, default=%(default)s') parser.add_argument('-r', '--rootdir', action='store', type=str, default=os.path.abspath('.'), help='web directory root that contains the HTML/CSS/JS files %(default)s') parser.add_argument('-v', '--verbose', action='count', help='level of verbosity') parser.add_argument('-V', '--version', action='version', version='%(prog)s - v' + VERSION) opts = parser.parse_args() opts.rootdir = os.path.abspath(opts.rootdir) if not os.path.isdir(opts.rootdir): err('Root directory does not exist: ' + opts.rootdir) if opts.port < 1 or opts.port > 65535: err('Port is out of range [1..65535]: %d' % (opts.port)) return opts def httpd(opts): ''' HTTP server ''' RequestHandlerClass = make_request_handler_class(opts) server = BaseHTTPServer.HTTPServer((opts.host, opts.port), RequestHandlerClass) logging.info('Server starting %s:%s (level=%s)' % (opts.host, opts.port, opts.level)) try: server.serve_forever() except KeyboardInterrupt: pass server.server_close() logging.info('Server stopping %s:%s' % (opts.host, opts.port)) def get_logging_level(opts): ''' Get the logging levels specified on the command line. The level can only be set once. ''' if opts.level == 'notset': return logging.NOTSET elif opts.level == 'debug': return logging.DEBUG elif opts.level == 'info': return logging.INFO elif opts.level == 'warning': return logging.WARNING elif opts.level == 'error': return logging.ERROR elif opts.level == 'critical': return logging.CRITICAL def daemonize(opts): ''' Daemonize this process. CITATION: http://stackoverflow.com/questions/115974/what-would-be-the-simplest-way-to-daemonize-a-python-script-in-linux ''' if os.path.exists(opts.daemonize) is False: err('directory does not exist: ' + opts.daemonize) if os.path.isdir(opts.daemonize) is False: err('not a directory: ' + opts.daemonize) bname = 'webserver-%s-%d' % (opts.host, opts.port) outfile = os.path.abspath(os.path.join(opts.daemonize, bname + '.log')) errfile = os.path.abspath(os.path.join(opts.daemonize, bname + '.err')) pidfile = os.path.abspath(os.path.join(opts.daemonize, bname + '.pid')) if os.path.exists(pidfile): err('pid file exists, cannot continue: ' + pidfile) if os.path.exists(outfile): os.unlink(outfile) if os.path.exists(errfile): os.unlink(errfile) if os.fork(): sys.exit(0) # exit the parent os.umask(0) os.setsid() if os.fork(): sys.exit(0) # exit the parent print('daemon pid %d' % (os.getpid())) sys.stdout.flush() sys.stderr.flush() stdin = file('/dev/null', 'r') stdout = file(outfile, 'a+') stderr = file(errfile, 'a+', 0) os.dup2(stdin.fileno(), sys.stdin.fileno()) os.dup2(stdout.fileno(), sys.stdout.fileno()) os.dup2(stderr.fileno(), sys.stderr.fileno()) with open(pidfile, 'w') as ofp: ofp.write('%i' % (os.getpid())) def main(): ''' main entry ''' opts = getopts() if opts.daemonize: daemonize(opts) logging.basicConfig(format='%(asctime)s [%(levelname)s] %(message)s', level=get_logging_level(opts)) httpd(opts) if __name__ == '__main__': main() # this allows library functionality |
Enjoy!
Updated to version 1.2 today.
Hi Joe,
Thank a lot for your tutorial! May I use it for my project?
When I checked your code with my editor, it informed this function
is deprecated in this module. Use
instead. You may want to update your code later.
Did you think about to use some template for html part? Because write it directly in web server file is not really a good way.
Yes. This is MIT licensed. I need to mention that somewhere. I will update it to make that clear.
And I also want to mention you that this program didn’t work on Windows, as now Windows didn’t support
You may find this link below helpful information:
AttributeError: ‘module’ object has no attribute ‘fork’
Thank you, that is excellent information.
Hi!
I just tried running this and I have a couple of questions.
1) When I first load, I get a warning:
“WARNING: Unobtrusive Javascript not working!” and Javascript is not working. How would you fix that?
2) When I enter something in the POST entries in the form, I get an error.
Error response
Error code 501.
Message: Unsupported method (‘POST’).
Error code explanation: 501 = Server does not support this operation.
Do you have an idea of what might be causing those errors? all I did was copy and run the code.
3) I am trying to quit ./webserver.py, but I can’t find it in my processes. How do you stop the server from running? I wanted to run ./webserver.py again, but I got this error:
ERROR: pid file exists, cannot continue: <filename>.
Thanks!